Category Archives: recipes

CSA, Week 15

September 30 was the fifteenth week of our CSA  (Waldingfield Farm, pick-up point Sandy Hook Organic Farmer’s Market behind St. John’s Episcopal Church).

Waldingfield CSA, Week 15

We scored:

  • three heads of lettuce
  • mustard greens
  • broccoli rabe greens
  • two bags of potatoes
  • several mini eggplants
  • green beans
  • assorted tomatoes
  • butternut squash
  • acorn squash

In honor of all of those greens, I made my own salad dressing from local (according to my statement) and regional ingredients (except, of course, the olive oil). Until I can think of a better name, I’m calling it:

Northeast Autumn Salad Dressing

1/4 cup olive oil
1/4 cup apple cider vinegar (from Gingerbrook Farm, S. Washington, VT; discovered at LACE in VT)
2 T apple cider (Rose’s Berry Farm)
2 T maple syrup (Bluestone Farm)
1 minced shallot (Cherry Grove Farm, Newtown, CT)
3/4 tsp of Sr. Catherine Grace’s habenero sauce
1 tsp dried basil (Shortt’s Farm)
pinch salt (Maine sea salt)

Mix all the ingredients except the oil, then whisk the oil in, with a slow steady stream so that the mixture emulsifies. Keep refrigerated. It tastes better the second day.

Like Buttah!

I tried my hand again at making butter from raw milk. The trick is allowing sufficient time for the cream to rise. It’s not difficult and the butter was delicious. Here’s how I did it.

  1. Separate the cream from the milk. I poured the milk into this glass vessel, covered and refrigerated it for at least 24 hours. (Although you can see a well-defined creamline after a just few hours, the cream isn’t separated enough yet–you really do need to wait at least 24 hours.) There is just under a half gallon of milk in the picture.
  2. Carefully skim the cream from the milk into another container. I skimmed about a cup of cream from my milk. (The milk came from Stone Wall Dairy, Cornwall Bridge, CT.)
  3. Blend, whip, or beat the cream until the butter separates from the milk. I used a stick blender. You can also use a blender, food processor, or mixer. It took less than five minutes for the butter to separate as shown. The milk part is real buttermilk. It has a miniscule shelf-life, so drink it now or freeze it to use later.
  4. Note: At this point, there are no more pictures. The rest of the procedure is predominantly manual and I didn’t want to get the camera greasy.

  5. Drain the milk from the butter. I used a wire mesh strainer.
  6. Rinse the butter by collecting it into a ball and immersing it in cold water. Knead the butter until the water is cloudy. Drain the water and replace it with more cold water. Continue kneading the butter and replacing the cloudy water until the water remains clear while you knead the butter. The point of this step is to remove the embedded buttermilk, which will go rancid and adversely affect the taste of your butter.
  7. If you like, you can salt the butter to taste.
  8. Wrap and refrigerate or freeze the butter. My yield was a little ball of butter, less than two inches in diameter.

butter

Raw Milk Yogurt

I finally made a decent raw milk yogurt! I had the flavor I wanted, but couldn’t get the consistency. I kept getting something that would properly be called a yogurt shake. The problem was that I wasn’t heating the milk enough. Heat destroys the enzymes and natural good bacteria in the milk and I wanted to keep those. Otherwise, why not just use pasteurized milk? But it turns out that the milk’s bacteria was competing with the starter culture! So, do you lose the benefits of using raw milk if you heat it to 180 degrees (as many yogurt recipes suggest)?

According to Linda Joyce Forristal (care of the Weston Price site):

Whatever temperature the milk will be heated to, in my opinion it is best to begin with raw milk. It is not homogenized so you get a wonderful cream on top. It has not had milk solids added to it, so it won’t stick to the bottom of the pan. Most important, raw milk has not been pasteurized, which is a violent, rapid-heating process that has a very detrimental effect on the proteins in the milk. A slow, gentle heating on your stove top will more effectively preserve the integrity of fragile milk proteins, especially if you remove the milk from the stove as soon as the desired temperature has been reached.

Here’s my recipe:
1 quart of raw milk
1/4 cup of good commercial organic yogurt as a starter (I used Seven Stars)

Measure out the starter and allow to come to room temperature while heating the milk. In a saucepan, slowly bring the milk up to 180 degrees, stirring periodically (it took me one hour). Allow the milk to cool back down to 110 degrees, again stirring periodically. Put the milk and starter into jars, twist on a lid, and place in a dehydrator at 115° for 8 to 10 hours. (I did 10.) Refrigerate the jars. Since the milk had not been homogenized, there is a lovely cream line.

Raw Milk Yogurt

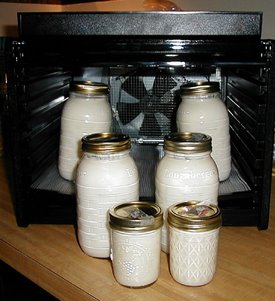
My biggest barrier to making my own raw milk yogurt was in finding a reliable low-heat source. My electric oven does not have a pilot and the light bulb lights intermittently. With the arrival of my Excalibur Dehydrator, I am ready to go!

I do like the organic local Hawthorne Valley yogurt as well as the organic regional brands from Seven Stars Farm (Phoenixville, PA) and Stonyfield Farm (Londonderry, NH). The problem for me is that these are all made from pasteurized milk because that is the law. Apparently, the few states that allow raw milk sales do not allow for the production and sale of raw milk yogurt. It seems to me that the food laws that are designed to protect us are the strangest of all.

So, I researched several recipes and it comes down to
– how much to heat the milk
– how much starter yogurt to add (for the live cultures)
– the incubation temperature
– the incubation time

The most popular milk-heating temperature is 110°. I did see one recipe that called for heating the milk to 180° and then letting it cool to 110°, but it seems it would defeat the purpose of using raw milk. I thought that the enzymes and beneficial bacteria are killed at 130°.

The recommended amount of starter yogurt to add varies from 1/8 of a cup to 1/4 (if you’re using commercial, which by default means pasteurized, yogurt). Most say to use about twice as much if you’re using your own previous batch of raw milk yogurt.

The suggested incubation temperature ranges from 90° to 110° and an often-suggested period is eight hours.

I got another recipe that called for heating the milk to 90°, adding 1/2 of a cup of (commercial) starter and incubating it at 90° to 100° for 18-36 hours. I have had this yogurt and it is exceptional, but this being my first time, I wanted something that would be ready sooner!

I went for heating the milk to 110°, and incubating it in the dehydrator at 105° for 8 hours. I did make two jars using 1/2 cup each of starter and two other jars using 1/4 cup each of starter.

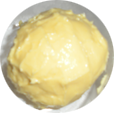
My yogurt came out similar in consistency to the Hawthorne Valley, perhaps slightly “looser.” There was no noticeable difference between the ones with 1/4 cup of starter vs. those with 1/2. It tastes amazingly like yogurt!

UPDATE: I found a better way to make the yogurt to get the consistency I want in July 2008.